Where to find Auth Configs
Navigate to the Auth Configs section from the left sidebar of your workspace. If none have been created yet, you’ll see an empty-state screen inviting you to “Create Your First Auth Configuration.” Click ”+ Create Auth Config” (top right) to start.Creating an Auth Config
Step 1 — Select the server.
Pick the MCP server you want to configure — Gmail, HubSpot, Slack, GitHub, Notion, and so on. The server list is searchable, and each row shows the authentication method(s) it supports (OAuth2, API Key, etc.).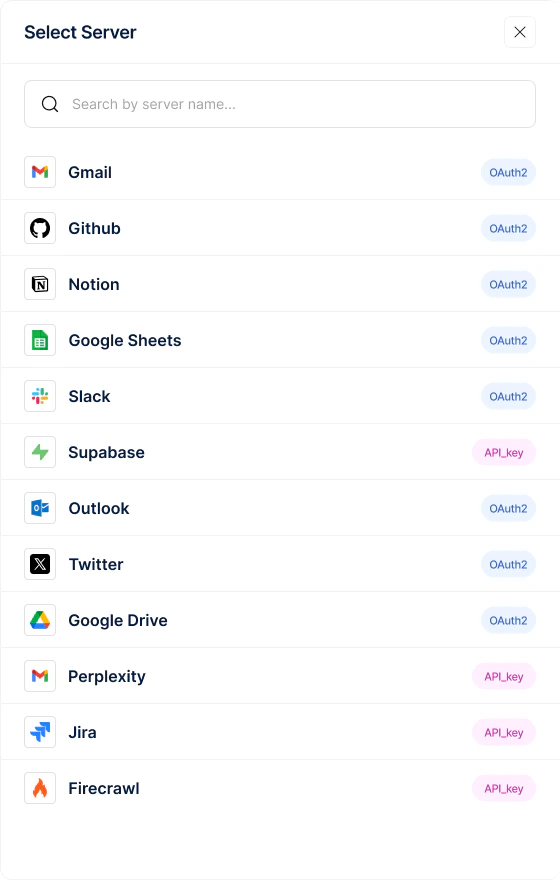
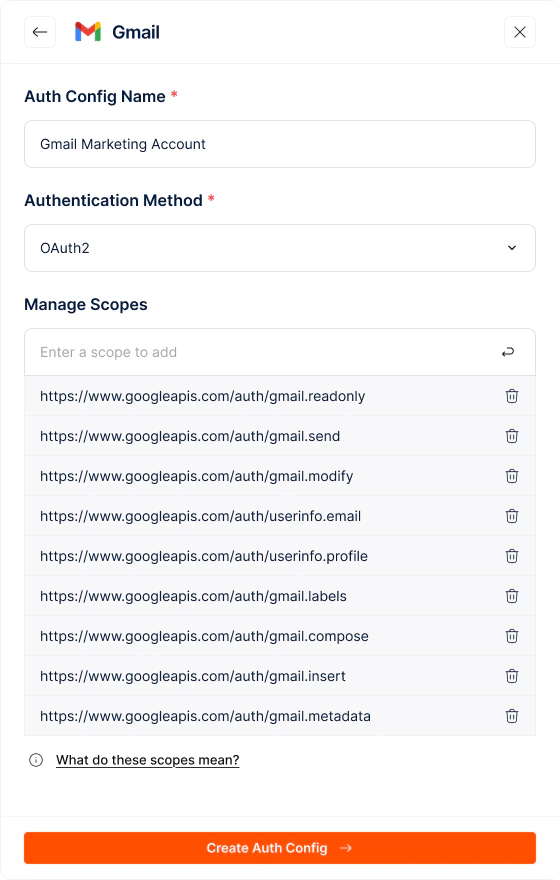
Step 2 — Configure the Auth Config.
Once you select a server (e.g., Gmail), a configuration panel opens with the server’s logo at the top. Fill in:- Auth Config Name (required) — a clear identifier like “Gmail — Sales Read+Send” or “HubSpot — Support Team”
- Authentication Method (required) — OAuth2, API Key, or No Auth, depending on what the server supports. The fields that follow will depend on the method you pick.
- Manage Scopes — for OAuth-based methods, add the scopes you want users to grant (e.g.,
https://www.googleapis.com/auth/gmail.send). Add one at a time and remove any with the delete icon. A “What do these scopes mean?” link gives scope-level context.
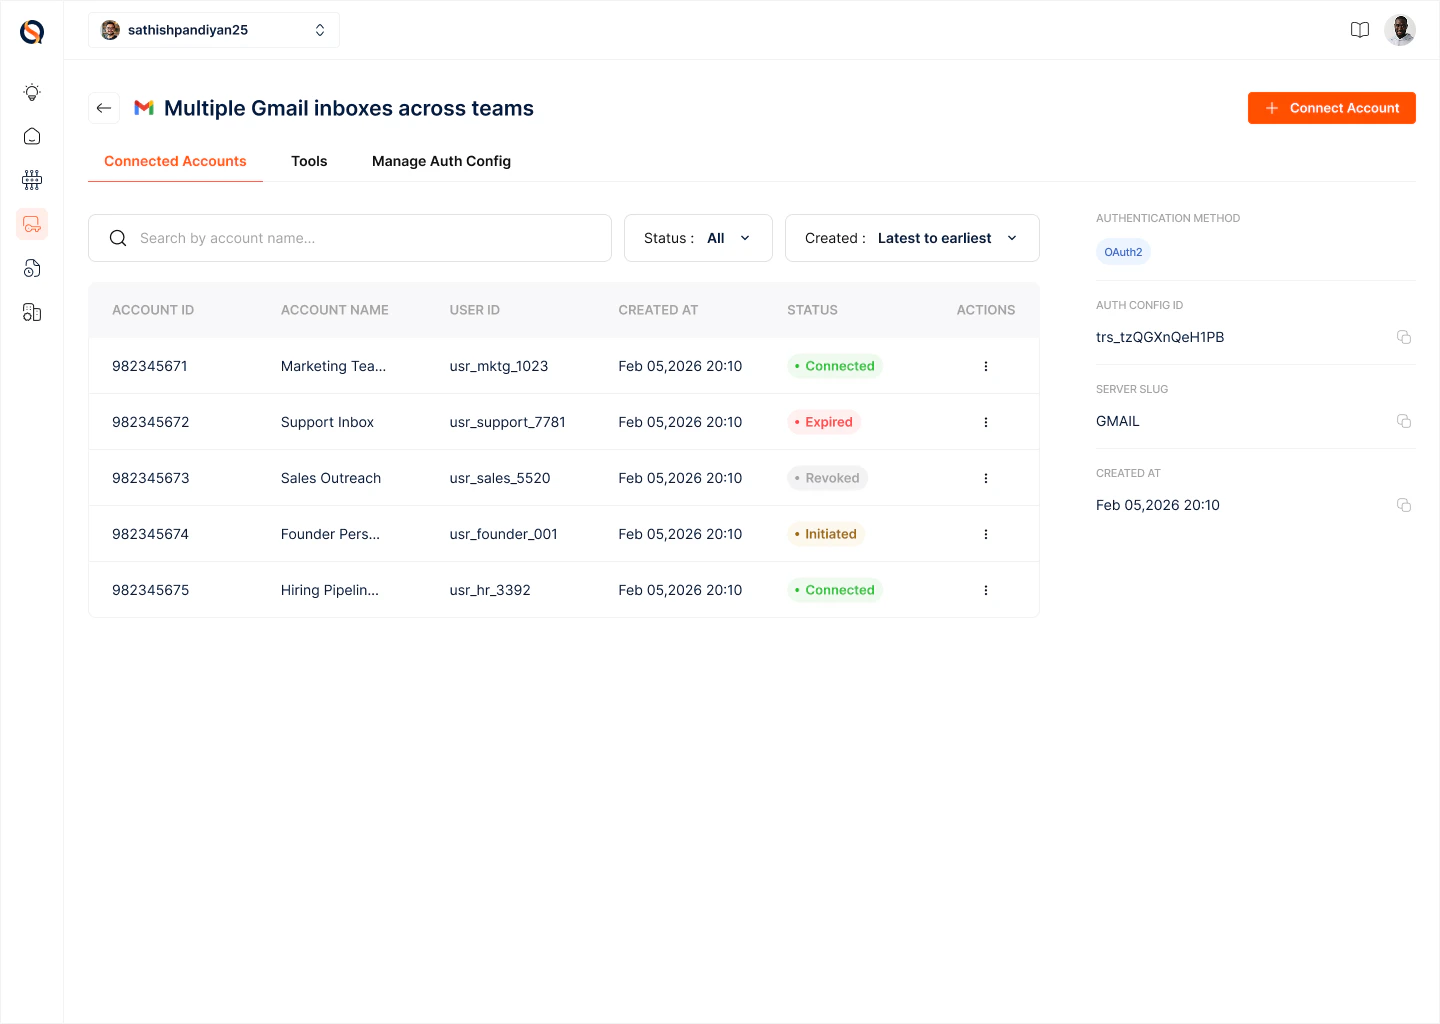
The Auth Config detail page
Once created, every Auth Config has its own detail page with three tabs:- Connected Accounts — the list of Connections (live authenticated accounts) created from this Auth Config
- Tools — the tools this server exposes, scoped to what the configured permissions allow
- Manage Auth Config — edit metadata, scopes, and settings
Connecting user accounts
A Connection is an authenticated user account bound to a specific Auth Config. From the Connected Accounts tab:- Click ”+ Connect Account” (top right).
- Provide a Connection Name — a clear label so you can recognise this account later (e.g., “Alice — Sales Gmail” or “Support Team Shared Inbox”).
- Set Visibility:
- Organisation — the Connection is shared across your organization; any gateway in the org can use it for runtime tool calls.
- Private — the Connection is only available to you; other team members can’t see or use it.
- Complete the OAuth handshake (or provide an API key, depending on the auth method). The user grants exactly the scopes defined in the Auth Config — nothing more.
- The new Connection appears in the Connected Accounts list with its name, account ID, status, and creation date.

Managing Connections
From the Connected Accounts list you can:- Search by Account ID or name
- Filter by Status (active, expired, revoked)
- Sort by creation date (latest to earliest, or the reverse)
- Open any Connection to view its details, re-authenticate, and revoke it when access is no longer needed
Managing the Auth Config itself
The Manage Auth Config tab is where you change the blueprint over time:- Rename the config
- Add or remove scopes
- Delete the Auth Config (which also revokes every Connection created from it — use with care)
Best practices
- Name Auth Configs by server + intent, not just server — e.g., “Slack — Support Posting” and “Slack — Analytics Read” rather than two configs both named “Slack.”
- Keep a separate Auth Config per scope profile. Don’t over-scope a shared config just to avoid duplication.
- Use Organisation visibility for shared service accounts (a single Slack bot for the whole team) and Private visibility for per-user accounts.
- Use the Auth Config ID to let end users connect their own accounts from inside your product — the cleanest pattern for multi-tenant SaaS.
- Revoke stale Connections periodically. Orphaned tokens are a liability.